Posts

Showing posts from August, 2017

How to use USB RFID readers on an Arduino Uno

Image
1. Plug the RFID reader into a Windows PC. Does it work without installing drivers? Open any editor such as NotePad. Read a card or key fob by passing the card or key fob on or near the reader. Do the characters appear on the screen as if typed at a keyboard? Look in Device Manager. The reader should be listed as a USB keyboard. If all the above are true, it should work with a USB host shield and Uno running the USB HID keyboard sketch. The same procedure applies to bar code readers. Do not expect all USB RFID and bar code readers to work like USB keyboards. Some devices such as RFID reader/writers require special USB drivers so are not usable with the USB host shield. The simple RFID readers shown above, read the RFID unique serial number. No other fields are returned. The readers cannot write to the RFID card. In the photo, starting at the top, are a 125KHz RFID reader, a 13.56 MHz RFID reader, Arduino Uno, and Circuits@Home USB host shield. Both readers work with the USB

Build a WiFi MIDI Controller

ESP8266 and ESP32 boards are cheap and easily available so it is now easy to send MIDI over WiFi. There is no need for UARTs, DIN connectors, or USB when using MIDI WiFi. See the github repo for demo programs.

How to Convert USB Host Mini Board to 5V

Image
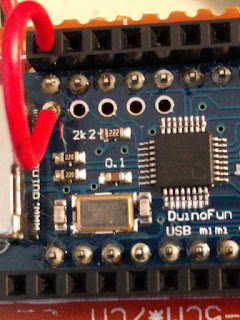
The USB host mini board is ideal to use with 3.3V logic systems such as ARM and ESP boards. However, it defaults to 3.3V on the USB host connector power pin (VUSB). Some USB devices work with 3.3V power but many do not. Fortunately, the board is designed to be modified. In the photo, the red line shows the trace to cut. This must be done to disconnect VUSB from the 3.3V power rail. The red wire connects VUSB to another power source. On this board, the red wire is connected to a Lithium battery. The USB spec requires 5V but my small collection of USB devices work when powered by the battery. If your USB device needs 5V, power the system using a USB power bank usually used to recharge cell phones. USB power banks output 5V and come in a wide variety of sizes. This change does not change the digital logic levels on the data pins. The board remains compatible with 3.3V boards. The only change is to the voltage output on the USB connector.

Defective Arduino USB Host Shield Boards

Image
UPDATE: The red wire is not needed. There are solder pads to the right of the reset button. Bridge the 5V pads to select 5V for VBUS PWR. In total, three blobs of solder are needed to make the shield work for 5V Arduinos. I received two new generic Arduino compatible USB host shields today. Both are defective. But they work after some troubleshooting. 1. After loading the USB_desc sketch, the debug message "OSC did not start." appears on the serial console. This means the USB host library cannot find the USB host hardware. I compared a defective board with a working board. One big difference is the 3.3V pads and 5V pads are not bridged on the defective board. This means the shield is not receiving power from the Uno! After bridging the pads, the board powers up. The error message "OSC did not start" does not appear. This means the USB host library found the USB host hardware. In the photo, the green boxes should contain one big solder blob. If there are

WeMos D1 R2 ESP8266 with USB Host Shield

Image
WiFi-enable a wide variety of USB devices using an ESP8266 and a USB host shield. For example, add a WiFi interface to a USB barcode reader or a USB RFID keyfob reader. The USB Host for Arduino driver  project has added support for ESP8266 so here are some of my experiments. For more details, see the demos on github.com. A modified USB Host Shield is plugged into a WeMos D1 R2 ESP8266 board. A USB host mini board fits on top of an Adafruit ESP8266 Feather. This configuration turns a $16 USB barcode scanner into a battery powered WiFi barcode scanner.