Posts

Speech to Text with DeepSpeech

Speech to text (STT) is a useful building block so I took a look at setting up DeepSpeech 0.6.1 for a test drive. My recipe for installing DeepSpeech on a Pi 4 running Raspbian Lite follows. If the Pi 4 is running the GUI desktop some packages may already be installed. sudo apt install git python3-pip python3-scipy python3-numpy python3-pyaudio libatlas3-base pip3 install deepspeech==0.6.1 mkdir ~/dspeech cd ~/dspeech curl -LO https://github.com/mozilla/DeepSpeech/releases/download/v0.6.1/deepspeech-0.6.1-models.tar.gz tar xvf deepspeech-0.6.1-models.tar.gz curl -LO https://github.com/mozilla/DeepSpeech/releases/download/v0.6.1/audio-0.6.1.tar.gz tar xvf audio-0.6.1.tar.gz source ~/.profile deepspeech --model deepspeech-0.6.1-models/output_graph.tflite --lm deepspeech-0.6.1-models/lm.binary --trie deepspeech-0.6.1-models/trie --audio audio/2830-3980-0043.wav deepspeech --model deepspeech-0.6.1-models/output_graph.tflite --lm deepspeech-0.6.1-models/lm.binary --trie deepspeech-0.6.1-...

M5Stack and Thermal Receipt Printer

Image
M5Stack (ESP32 with battery and display) with USB host module printing on a portable thermal receipt printer. The cable is an ordinary USB cable. The printer has a large battery so it does not take power from the M5Stack. For more details and source code see https://github.com/gdsports/print-pics

Arduino WiFi TLS 1.2

https://www.howsmyssl.com/ returns helpful information about a TLS client such as TLS version number and possible security issues. The rating "Probably Okay" is the highest possible rating. The MKR WiFi 1010 (WiFiNINA), Feather M0 with ATWIINC1500 (WiFi101), ESP32, and ESP8266 Bear SSL all support TLS 1.2 and receive the "Probably Okay" rating. For the details and source code see the git hub repo .

Arduino Due WiFi and TLS

The Adafruit Airlift ESP32 WiFi Co-Processor Breakout board works with the Arduino Due. All the crypto for TLS (formerly known as SSL) is done by the ESP32. The Airlift ESP32 is very similar to the u-blox NINA-W10 used on the Arduino MKR WiFi 1010 and the Uno WiFi Rev 2. Adafruit has their own variation of the WiFiNINA library modified to work with various Adafruit boards. The Due works using the Adafruit library with default settings. The wiring is identical to the following except substitute an Arduino Due for the Adafruit Metro. https://learn.adafruit.com/adafruit-airlift-breakout/arduino The Airlft should work with Uno, Leonardo, and Mega 2650 but I have not  tested them. Note the AVR CPUs have much less RAM than the ARM CPUs (Due, Zero, MKR series). For example, weather web sites return large amounts of data so may not work on AVR CPUs. Or the code must be more complex to extract data values on-the-fly. The Airlift can draw as much as 250 mA so be sure to account for t...

Microsoft Xbox Adaptive Controller with Logitech Extreme 3D Pro Flight Stick

Image
The Logitech Flight Stick with hat switch connected to the Microsoft Xbox Adaptive Controller (XAC) is a good solution of one-handed Xbox gamers but the XAC ignores the hat switch. The joystick splitter project is one way to solve this problem using Arduino compatible boards. Enabling the hat switch makes one handed gameplay much easier. This project also changes the default button mapping so the buttons work for most games. https://github.com/gdsports/xac-joystick-splitter The project does not require modifying the joystick or the XAC. The joystick splitter works by capturing USB joystick messages from the Logitech joystick then sending them out to the two XAC USB joystick ports. The hat switch appears to the XAC as another joystick.

Using Beagle USB 12 on Ubuntu 18.04

I upgraded from Ubuntu 14.04 to 18.04 then found the Total Phase Data Center software for the Beagle USB 12 no longer works. strace shows a number of missing shared libraries. The solution is to copy the missing libraries from 14.04 into the Data Center local library directory. data-center-linux-x86_64-v6.73/lib/ libpng12.so.0 libgstinterfaces-0.10.so.0 libgstapp-0.10.so.0 libgstpbutils-0.10.so.0 libgstvideo-0.10.so.0 libgstbase-0.10.so.0 libgstreamer-0.10.so.0

Adafruit M4 (SAMD51) and Playstation 3 Controller over Bluetooth

Image
The USB Host Library for SAMD  now supports the PS3 game controller over Bluetooth. This is a port of the PS3BT code from the USB Host Shield 2.0 project. The Metro M4 is an Arduino compatible board from Adafruit. The SAMD51 is a Cortex M4 running at 120 MHz and has hardware floating point, 512 KB Flash, and 192 KB RAM. Components starting from the Metro M4 board. Adafruit Metro M4 with USB OTG to host adapter and USB Bluetooth plug USB FTDI serial board for serial console and power USB phone/tablet charger, 5V Playstation 3 controller (clone) with Bluetooth FTDI    | Metro M4 board ------  | --------- 5V      | VIN GND     | GND RXD     | TX-1  (Serial1) TXD     | RX-0  (Serial1)

USB Host Library for SAMD

Image
The USB Host Library for SAMD  is based on the USB Host Shield Library 2.0 with modifications to work on Arduino and Arduino compatible SAMD boards. Some drivers (ftdi, pl2303, cdcacm, HID, MIDI, Xbox controller, and Playstation controller) have been tested and some not at all (ADK and Bluetooth). The Arduino Zero, M0, and MKR Zero boards are known to work. A few Adafruit M0 (Trinket M0 and Feather M0 Express) and Metro M4 boards are also known to work. The library uses the built-in USB OTG hardware also known as the native USB port. The MAX3421E controller is not supported. The Arduino Due native USB port is not supported. USB Host Library for SAMD

Teensy 3.6 USB host printer driver released

Image
The Arduino ESC/POS printer library has been released. It is designed to work with USB receipt printers on the Teensy 3.6 USB host port. The Teensy 3.6 USB host printer driver is required. https://github.com/gdsports/USBPrinter_t36 https://github.com/gdsports/ESC_POS_Printer The ESC/POS printer library is based on the Adafruit Thermal printer library but is designed to work on USB receipt printers. ESC/POS refers to the commands to control the printer fonts, graphics mode, etc. The following is a useful reference. https://reference.epson-biz.com/modules/ref_escpos/index.php

Dvorak, Colemak, and Teensy 3.6

My fork of the keymapper project is another result of experimenting with Teensy 3.6 USB host. The keyboard remapper supports alternate keyboard mappings including QWERTY, Dvorak and Colemak. Hot keys are defined to make it easy to switch among mappings. Both USB ports of the Teensy 3.6 are used. The host port is where the USB keyboard plus in. The device port is where the computer plugs in. The remapper reads key codes from the keyboard, swaps key codes if needed, then writes the key codes to the computer.

Teensy Typewriter

Image
I have been experimenting with the Teensy 3.6 USB host library. The first result is the Teensy Typewriter project which connects a Teensy 3.6 with a USB keyboard and USB printer. Anything typed on the keyboard comes out on the printer. Next up (maybe) an ESC POS printer command library similar to the Adafruit Thermal Printer library. The commands are not quite the same and the Adafruit library includes lots of timing specific to the Adafruit thermal printer. After that the next project title will be "Teensy Typewriter ft. SMS". I have an Adafruit FONA somewhere. The idea is an SMS hardcopy terminal reminiscent of Telex/TWX machines.

Long Range Wireless Keyboard

If you need a wireless keyboard that works over long distances or through many walls, this might be the solution. The USB keyboard plugs into the sender board with an RFM69HCW radio. The receiver board with RFM69HCW radio plugs into the computer. All radio communications is encrypted using AES-128. Be sure to change the default key in the source code. https://github.com/gdsports/rfm69-usb-devices

ESP8266 PIR Motion Detector

Image
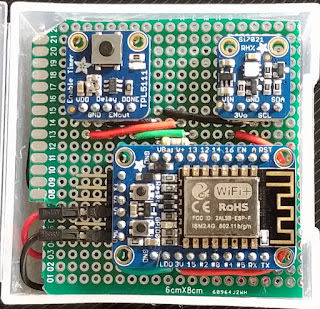
This project connects a PIR motion detector to an ESP8266 but it is especially battery efficient because the ESP8266 is turned off when motion is not present. Adafruit Huzzah ESP8266 board Adafruit PIR motion sensor Batteries, 3xAA Battery PIR     ESP8266 Huzzah ======= ===     ============== POS --- 3-5V -- VBAT NEG --- GND --- GND         DOUT -- LDO cut pull up The PIR maximum voltage is 5V. Four batteries produces 6V which is too high. There is a pull up resistor on the LDO enable pin which is required when nothing is connected to LDO. In this case, the PIR DOUT signal is connected to the LDO pin so the pull up is not needed. To get maximum battery life, the resistor must be disconnected to prevent it from wasting power. In the following photo, the red line shows the trace to cut. LDO is the enable pin for the 3.3V voltage regulator (VR). When grounded, it turns off the VR so everything on the 3.3V...

ESP8266 and TPL5111

Image
The TPL5111 timer chip is used to power the ESP8266 board on and off to maximize battery life. This is a better alternative to using ESP8266 deep sleep. Adafruit TPL5111 breakout board Adafruit Huzzah ESP8266 board (not Feather) 3xAA batteries in battery holder. TPL5111     Huzzah  3xAA Batteries -------     ------  -------------- VDD         V+      Pos GND         GND     Neg Delay       n/c ENout       LDO DONE        #13     4.7K Ohm pull down The resistor on the DONE pin ensures it remains LOW while the ESP8266 powers up. In the setup function, GPIO #13 is set to OUTPUT LOW. When the ESP8266 is ready to power off, it sets GPIO #13 HIGH. When the TPL5111 sees the LOW to HIGH transitio...

Stick-on Four Button USB MIDI Controller

Image
Sometimes your gear really needs a few MIDI control buttons strategically located. Now you can stick them on. https://github.com/gdsports/buttons4

Build a MIDI button controller from a QWERTY USB keyboard

Image
The sketch demonstrates how to send MIDI messages such as Note On/Off,  Program Change, and System Exclusive messages. The source code and instructions are here. https://github.com/gdsports/USBHIDKbd2MIDI

How to create cacert.h for ESP8266 secure TLS example

How is the following root CA file created? https://github.com/esp8266/Arduino/blob/master/libraries/ESP8266WiFi/examples/HTTPSRequestCACert/CACert.ino Here is one way to do it by hand. If you need to do this a lot, a Python script could probably do all of it. In FireFox connect to "https:://api.github.com". In the address bar, to the left of the URL, click on the circled 'i' icon for more information. Click on the '>' icon. Click on "More Information" button at the bottom of the window. In the new window titled "Page Info - https://api.github.com", click on the "View Certificate" button. In the "Certificate Viewer" window, click on the "Details" tab. In the "Certificate Hierarchy" top window pane click on "DigiCert High Assurance EV Root CA" so it is highlighted. Click on the "Export..." button at the bottom of the page. At the bottom of the page select "X.509 Certif...

MIDI USB Host to DIN with Arduino SAMD Board

usbh_midi_samd is the USBH_MIDI driver from the USB Host Shield 2.0 project to the ArduinoCore-samd project. Most of the time was spent fixing bulk in/out pipes. A USB OTG to host cable or adapter is required. The driver has been tested minimally on an Arduino Zero but it should work on other boards based on the SAMD family. For example, the driver works on an Adafruit Trinket M0.d https://github.com/gdsports/usbh_midi_samd

Mini Untztrument

miniuntz is based on the code at [Adafruit's Mini Untztrument tutorial](https://learn.adafruit.com/mini-untztrument-3d-printed-midi-controller) but miniuntz does not depend on Teensy USB code. It uses the Arduino MIDIUSB library by Gary Grewal which simplifies the software installation. miniuntz has been tested on the SparkFun Pro Micro 5V which has the same processor (32u4) as the Leonardo. The Adafruit Itsy Bitsy 5V also has a 32u4 processor so it should also work. miniuntz has been tested on the Adafruit Trinket M0 with bidirectional logic level changer.  Analog inputs are not tested. But the Trinket M0 should have 3 inputs for analog input, if desired.  This should also work with the Itsy Bitsy M0, Feather M0, SparkFun SAMD21, and Arduino Zero. All use 3.3V logic levels so a logic level converter is used. https://github.com/gdsports/miniuntz

Arduino MIDI UART to USB converter

Bi-directional converter between MIDI USB and MIDI UART. There are many pages that describe how to connect a UART port to DIN connectors so it is not covered here. Install MIDI Library and MIDIUSB libraries. Tested using Arduino IDE 1.8.5. Maximum System Exclusive size is 1024 bytes. Tested in 32u4 boards such as Arduino Leonardo, SparkFun Pro Micro, and Adafuit Itsy Bitsy. Tested on Arduino Zero and Adafruit Trinket M0. It might work on other SAMD21 boards. SAMD21 has more RAM so the System Exclusive size could be made larger, if needed. https://github.com/gdsports/MIDIUARTUSB